YOUR SITEPACK USER GUIDE
SITEPACK / USER GUIDE
Your work first.
The detail when you need it.
A practical guide to reporting from site, finding your next task and following work through to review.
START WITH WHAT YOU NEED
What are you here to do?
All company members
Start here
Use Sitepack in your phone or computer browser. The signed-in workspace is for authorised company members; shared worker links only provide the access granted by that link.
- Open app.sitepack.com.au and sign in or create an account. Complete any account, company or consent steps shown. A company join request may need owner/admin approval.
- Open More > Settings. Check your name and mobile. An owner/admin should check company details, state, primary trade and how the business mostly gets work.
- Choose Projects & jobs, Service & callouts or Mix of both where appropriate. This affects the existing job and callout tools, not the safety review rules.
- Owners/admins manage team access and billing. Check current terms and pricing in the account rather than relying on an old guide or promotion.
All company members
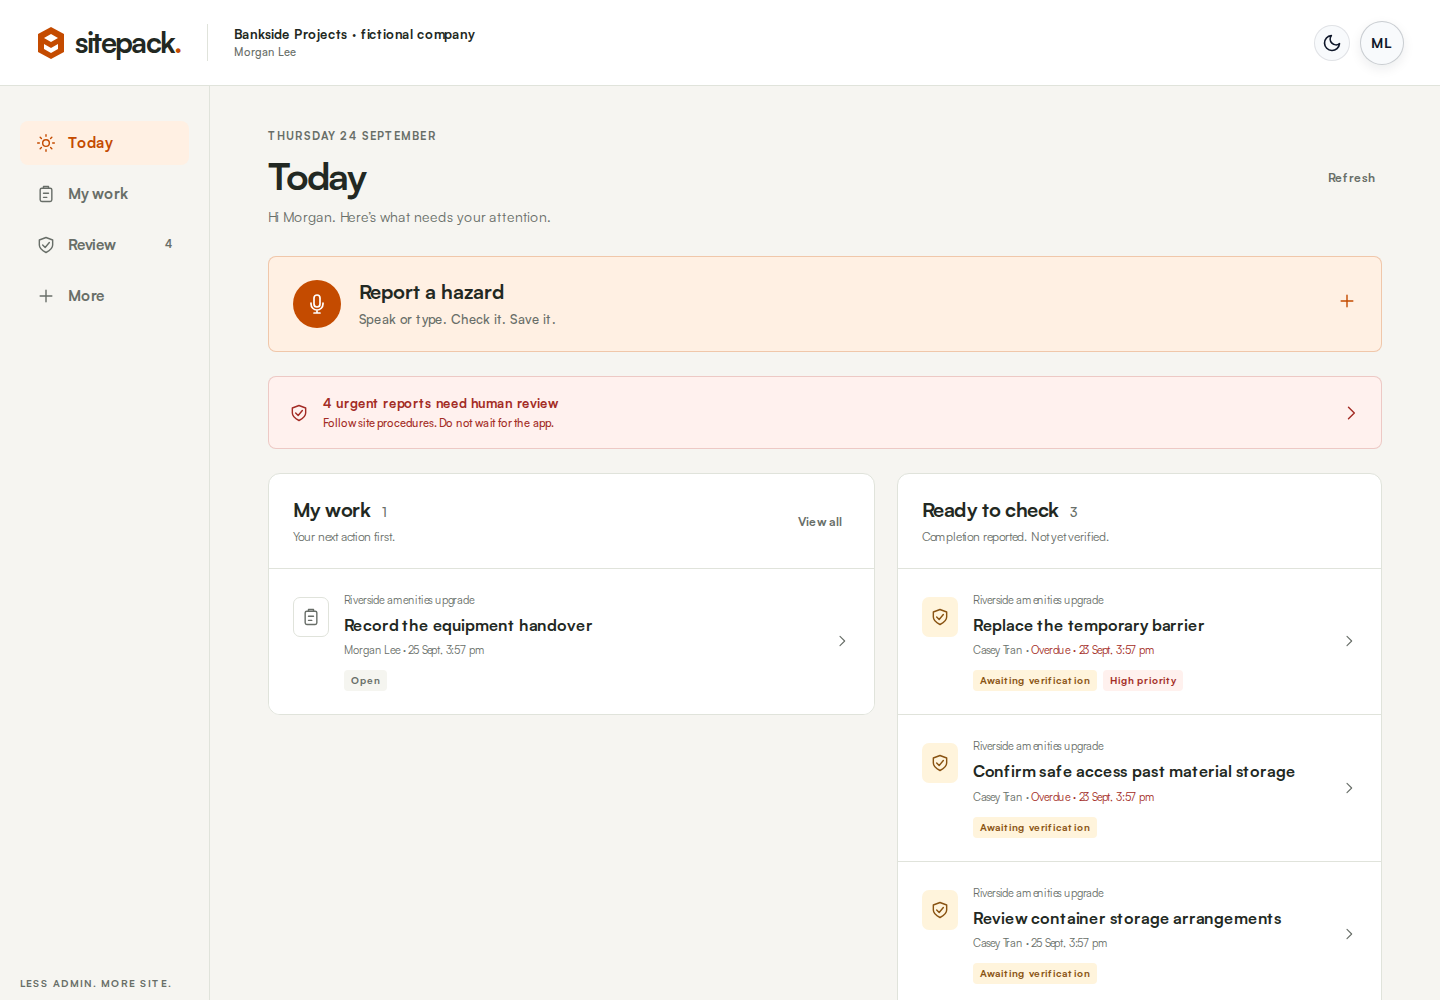
Find your next step on Today
Today is the starting screen. It brings personal actions and urgent attention forward without replacing the full registers.
- Use Report a hazard for a new field report.
- Open My work for actions assigned to you. Read the required work, priority and deadline before taking a step.
- Owners/admins can open Review for reports and completed work needing a decision. Leads do not receive the same review controls.
- Open More for the original tools, jobs, settings, full safety register, assignment and delivery controls available to your role.
- Use Refresh when you need a fresh view. Open the full register for filters, history and records beyond a summary list.
See the Today screen
People reporting from site
Report a hazard in three steps
From Today, choose Report a hazard. Capture the facts you know, including what you saw and where, without filling gaps with guesses.
- Record: tap Record and allow microphone access. Choose Type instead if recording is unavailable or not suitable.
- Speak: describe the situation and location. Tap Stop when finished. Stopping sends the recording to OpenAI for transcription.
- Check and save: correct the transcript, use Job details if relevant and flag immediate danger when applicable. Choose Save report and wait for the saved confirmation.
- To retain the original audio, download it before leaving the tab. The capture recording is not automatically stored with the hazard; upload it separately as evidence if required.
- Open the saved report to register supporting photos or audio. Evidence upload has its own confirmation and may reopen review.
Authorised owners & admins
Review hazards and immediate danger
Treat the original account and the AI draft as different things. An authorised person must assess the report and the actual conditions.
- Open the urgent report or review queue. Read the original account, registered evidence, current urgency and decision history.
- If facts are missing, request clarification using the available decision. Do not treat a confident AI draft as evidence of conditions that were never reported.
- Record a human assessment or implemented controls only when the decision is supported by what has actually been done.
- Assign linked follow-up actions where work needs an owner and due date. Creating an action does not itself control the hazard.
- Urgent clearance is a separate authorised owner/admin decision. An action being verified does not automatically remove outstanding urgent review.
Assignees and permitted reviewers
Assign, complete and verify work
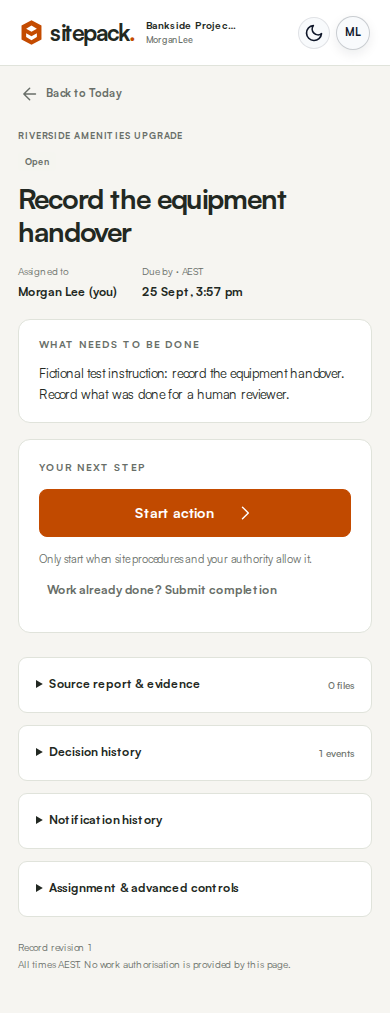
The focused task page shows the required work, responsible person, due date and next step. Expand the secondary sections for evidence, history and advanced controls.
- To assign work, use Assign an action from the hazard or More. Record a clear title, required work, responsible person, due date and priority.
- As the assignee, read the task. Choose Start action only when your authority and site procedures allow it. If the work is already done, use the completion option.
- Describe what was completed and select registered supporting evidence where required. Submit completion and check the saved state.
- Awaiting verification means completion was reported, not independently confirmed. A permitted reviewer checks the result and verifies it or returns it with a reason.
- High-priority actions cannot be verified by their assignee or completion submitter. Lower-priority self-verification, where permitted, requires a reason.
- If someone else changed the record, load the latest version, review the differences and deliberately reapply your decision. Do not blindly repeat a stale submission.
See an example task
Enabled companies & authorised admins
Understand notifications and escalation
Safety-action SMS, reminders and escalation are in a limited rollout. They require company activation, eligible recipients and delivery gates. Ask the account owner or Sitepack to confirm your company is enabled.
- Open More > Notifications & escalation, or expand Notification history on a task or report.
- Read the actual delivery state. Queued is not sent. Sent is not delivered. Delivered is not read or acknowledged.
- Check recipient and escalation settings with an authorised administrator. Do not assume every worker or supervisor receives every notice.
- For failed, suppressed or uncertain outcomes, inspect the reason and use a direct contact method when safety requires it. Only use supervised recovery controls after reviewing what happened.
- Treat worker links as access-bearing links. Share only with the intended recipient; they are not equivalent to an authenticated company-review session.
Members with access to the tools
Use the original tools for jobs and callouts
The tools have not disappeared. Open More or Tools dashboard for the existing workflows. Keep your competent-person review and on-site procedures in place.
- Projects: open Jobs, create or select the job and maintain its crew roster. Generate and review the required SWMS, then share the permitted sign-on link or QR.
- Service/callouts: open Take 5 or SWMS and select the one-off callout/no-job option where available. Record the location and review the record before using it.
- Mixed work: use the job for planned work and the callout path for site-less records. The callout register lists compliance records, not dispatch bookings or invoices.
- Toolbox talks: prepare or review the talk, deliver the discussion and retain sign-on records. Check the job's actual scheduling and delivery settings rather than assuming automation is enabled.
- Incidents/near misses: open Near miss or the incident register from the tools dashboard. Record the account and evidence; review AI suggestions and make any required external notifications separately.
- Tools dashboard also provides company documents, SWMS register/library, handover and other enabled modules. Module availability and account gates still apply.
All users
Recover safely when something goes wrong
A success message is the evidence that a save completed. A recording, draft or queued request is not a saved safety record.
- Microphone blocked: allow browser microphone access or choose Type instead. Retry transcription only when connected; check every recovered transcript.
- Offline or failed save: keep the tab open and retain a separate copy where safe. Reconnect and confirm the save. There is no promised durable offline outbox or automatic background sync.
- Session expired: retain the unsaved account before signing in again. Draft-retention protections do not guarantee recovery after closing a tab, clearing browser data or restarting the device.
- Missing action or review option: check the company, account role and current record state. Ask an owner/admin; do not use someone else's account or link to bypass access limits.
- Evidence: hazard attachments support up to 10 MiB per file, with six photos and one audio file per hazard. Check the upload confirmation; this limit is different from voice-transcription capture.
- For account or product help, contact hello@sitepack.com.au with the page, approximate time and error text. Avoid sending unnecessary personal or sensitive incident details.
NEED A HAND?
Ask your company administrator first.
For account or product help, email hello@sitepack.com.au. Include the page, approximate time and error message, without unnecessary personal or sensitive details.
For urgent safety matters, use your site’s escalation and emergency procedures. Product support is not an emergency response service.